

Look List Information
Look List Area
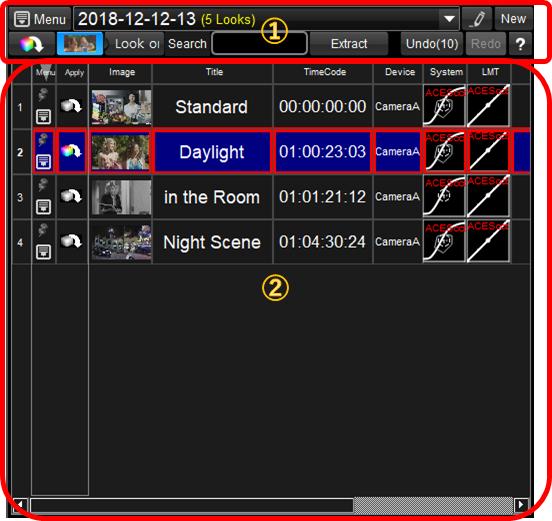
This area is to manage and use "LookList".
By clicking  icon, you can apply the look and/or workflow to the active device. Customizing the view of the look list table, search and filtering, copy & paste, delete, save and load, exporting, and so on, are available here.
Right click in area② triggers pou-up menu.
You can go into Look Title editing just click f2 key in any state. Up/Down key enables you to move Look to Look, so you can edit all of the Look Titles only by keyboard, without using mouse. Undo/Redo function can cancel the edit of the Look List, including the delete of the Looks, so you can edit Look List with safe.
function |
contents |
|
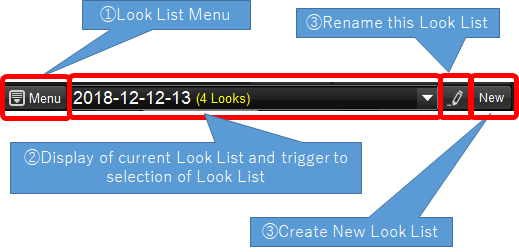
① |
Show the menu which relates to this look group. Various management, saving and loading LMT files, exporting functions can be available. |
|
② |
Look Group Name |
Showing the current look group name and the number of the looks. By clicking, the dialog which can browse and select the look group will be shown. Not only the groups you created, but also the preset groups WonderLookPro is providing. |
③ |
Edit Look Group Name |
Popup the dialog to edit the name of the Look Group. |
④ |
New Look Group |
Create the new Look Group. Pouup the dialog to name the list. |

function |
contents |
|
① |
Extraction of the Look by key word |
The looks will be extracted by the word input here. It will search all of the items and shows the look the words was found somewhere. It is the incremental search so you can confirm the result just after input the every character here. |
② |
Other extraction |
The device created the look, rank, whether or not it contains the calibration, can be used for the extraction of the looks. |
③ |
Undo / Redo |
All of the operation regrading look can be used undo / redo operation. This function helps you to edit look list with safe. |
LookList area shows Look List Tables of currently active look group. The order of the looks is in an array of created time in default, but you can change the order by clicking the header items to be sorted in ascending/descending by the item, change the order by drag and drop of the look item, extract the looks by the key word of some other conditions. By clicking the inside table, you can trigger various functions depending on which column you clicked. Each columns can be widened or narrowed, change the order by drag and drop, or select the visibility. These functions are explained at "Look List Customize" section.
function |
content |
|
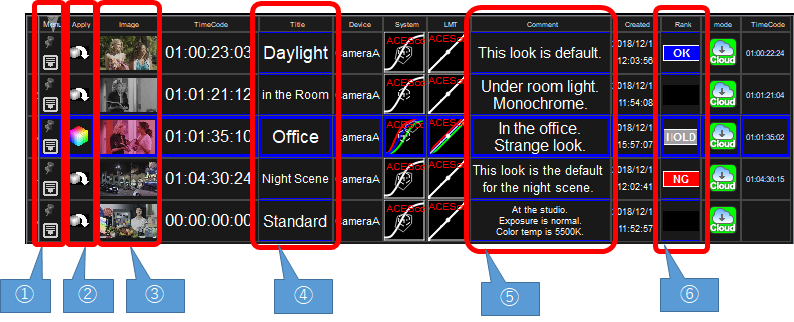
① |
Pinned function |
By clicking here, the icon changed to |
① |
It will trigger to show the pou-up menu, which contains various operations of the look. |
|
② |
Apply Look |
Apply the look to the currently selected device and send the LUTs of it. The icon will be changed to |
③ |
Load the image which was saved with the Look, to the image area. If the device was IS-miniX, you can send this image to IS-miniX and reproduce the setting and color when you created this look. |
|
④ |
Edit Title |
You can edit the title of the look. The title allows only one line sentences. "Enter" key finish the editing and move to next look for editing title. f2 key triggers the editing the Title. Up or down keys can change the target of the editing look, so you can edit all of the titles of looks only by using keyboard. |
⑤ |
Edit Comment |
You can edit Comment. Comment can be input multiple line sentences. |
⑥ |
Rank Setting |
You can set the rank of the look. Clicking triggers to show the pop-up menu which has the menus of OK/HOLD/NG/NONE. |
Other |
Selection of the Look |
Clicking other column will select the clicked look. You can select multiple looks by clicking under puching CTRL key, or SHIFT key. Selected looks can be used for exporting, copying or deleting from the right click menu. |


