

Device Information Panel
Device Information Area/Project Management
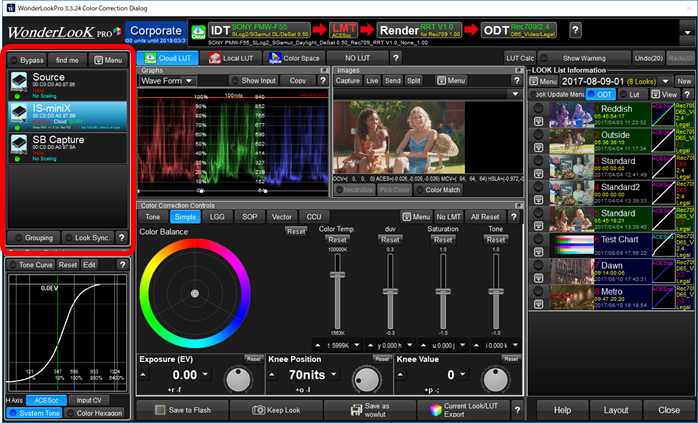
This ares show the list of connected devices(LUTBOX and Cameras9 and provide the means to select the active device, and manage them.
And you can save the entire project settings or load the project settings from local file on the menu of this area.
The order of the devices can be changed by drag & dropping. The changed setting is remembered and the order will be reproduced for the next use.
function |
content |
|
① |
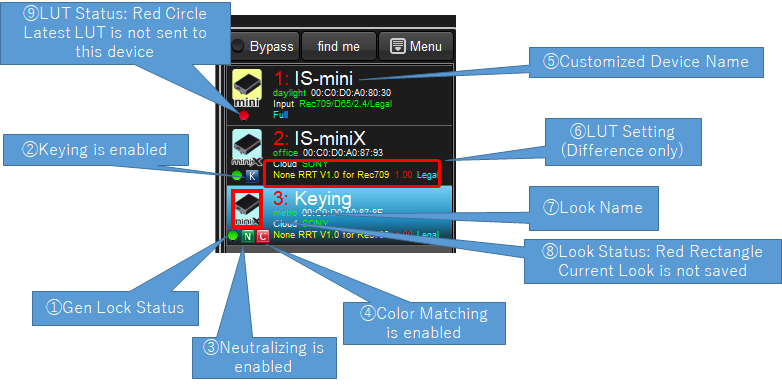
Gen Lock Status |
It shows Gen Lock State for IS-mini/IS-miniX. |
② |
Keying Icon |
It shows Chroma-key status for IS-miniX. |
③ |
Neutralize Icon |
If the device is using Neutralize function, the N mark will be shown. |
④ |
Color Matching Icon |
If the device is useing Color Matching function, the C mark will be shown. |
⑤ |
Device Name |
If you set your device name for the LUTBOX, the name will be shown.To set the device name, please refer to following section 1. |
⑥ |
LUT setting |
If you are using more than two LUTBOXes, the difference of the settings of these LUTBOXes are shown here. |
⑦ |
Look Name |
It is the name of the Look associated with this device. If the name of the look can not be found on the look list, the display will be blank. |
⑧ |
Look Status (Alert) |
The red rectangle on the device icon means the device look is not saved on the look list. By clicking "Keep Look New" or "Keep Look Overwrite", the current look will be saved on the look list and the red rectangle will disappear. |
⑨ |
LUT Status (Alert) |
When you are using "Batch Send" mode and you changed the look by color correction, the latest LUT will not be sent until the click of "Send Lut" button. Red circle means the LUT should be updated by clicking send LUT button. |
1.Device Selection and Device Information
Clicking other than icon regeon change the active device. You can only create colors for active device or active group.
Clicking icon or double clicking anywhere shows you the device information management screem. (detailed explanation)
You can change the order of the devices by drag & drop the item. The software remember the order to reproduce the order after re-started the program.
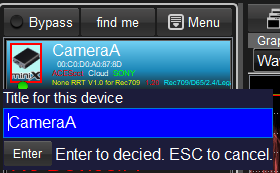
While mouse cursor is on the device item, you can click F2 key to show popup window which enables you to change the name of the device.
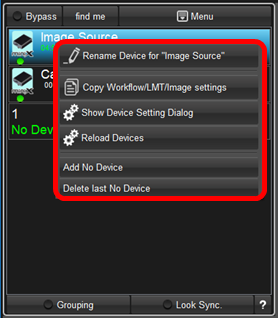
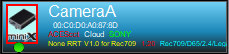
Same as above, you can right click while mouse cursor is on the device, to show popup menu.
It enables you to change the device name, trigger to show the device information management screem. (detailed explanation) (same as double clicking the icon), or seach the devices again.
Menu |
Action |
|
Pop up the editor to change the name of the device. |
|
All of the settings of the device on this screen will be copied to clipboard so as to paste them to other device. |
|
Paste the setting copied by above command to this device. Workflow settings, Looks, and selected images will be completely matched to the copied device. |
|
Start the search for the connected devices. |
|
Add the device slot which is not assigned to real device. "No Device" is the device which is not connected to real device, which means you can analyze images, create looks or evaluate LUTs by using this virtual device selection. As default, one "No Device" is always shown. You can increase the number of "No Device" by this command. |
|
Delete the last added "No Device" slot. |


2.Confirmation of the Device / Bypassing the process

Bypass : Only when selected status, the device output bypassed image (without LUT processing)
find me : Output rectangle while pushing the button to show the output of the device.
Menu : Research the devices and project management menu.
function |
content |
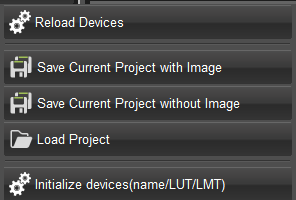
Reload Devices |
Search the devices from USB connection and Ethernet connection (depends on the setting) |
Save Current Project with Image |
You can save the project settings into one file(.wlp). The file will include, each device's settings, each device's LUT and LOOK settings, Look List information and related image files. These image files make saving time longer and file size bigger. |
Save Current Project with Image |
You can save the project settings into one file(.wlp). The file will include, each device's settings, each device's LUT and LOOK settings, Look List information. It will not include image files so the saving time is not so long and the file size is rather small. |
Load Project |
Load project information form project file(.wlp). This action will make current project settings lost so please save it beforehand if necessary. |
Initialize devices(name/LUT/LMT) |
Clear all of the device related information, name of the device, LUT information, Look information. It will not delete saved Looks on the Look List. |
3.Grouping (link to detailed explanation)

Grouping enables you to make groups of devices and to control the devices in the group simultaneously with the complete same parameters.
4.Look Sync(link to detailed explanation)

Look Sync is to synchronize the LOOK you created with selected device or group which might have different camera IDT or different monitor settings.