

Select Local LUT
Local LUT selection screen
On this screen, you can select the LUT while confirming the content of the LUT by viewing headers and color reproduction graphs. LUT format would be automatically detected but you can forcefully designate the format to load.
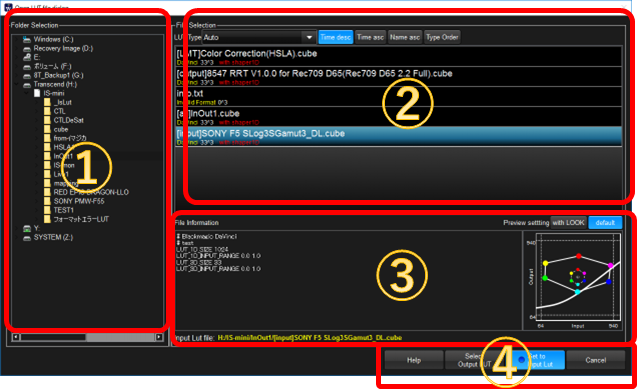
①Folder Selection
Please select the folder the LUT file exits you are going to use.
②LUT file List
The list of the LUTs in the selected folder would be shown. LUT type can be auto as a default but you can select specific format when you need to designate the format by selected from the combobox. By clicking the LUT file, LUT information in the regeon of ③ would be updated and LUT would be sent to the device if you connected it.

These buttons control the order of the LUT showing.
Time desc |
Descending order of updated time. Newer one come first. |
Time asc |
Ascending order of updated time. Older one comes first. |
Name asc |
Ascending order of alphabet. |
Type Order |
Grouping the same format. |

The LUT is downloaded from Cloud, the format is wowlut. This file contains camera information and rendering information in one file, and it shows each parameters.

This LUT is Film Master format. WonderLookPro recognize the format automatically and it shows "FilmMaster" in yellow character. 33^3 means grid number of the LUT.

The LUT is DaVinci format. WonderLookPro recognize the format automatically and it shows "DaVincir" in yellow character. 26^3 means grid number of the LUT. It contains 1D LUT in the same file, so it shows "with shaper1D" in red character.
③LUT file information / Input file selection information
It shows LUT file information you selected. Left side is header information, right side is the graph of system tone curve.
The lowermost side lies input LUT selection status. When selected, the file name was shown in yellow character. (plase refer to the explanaion at ④)
④Command Buttons

In usual cases, you can click "Open" to finish the selection and move to the next step.
If you want to use both inpout LUT and output LUT combined, you have to select inputLUT first and click "Set to Input LUT" button.
After it, select first LUT name was shown in yellow character and "Set to Input Lut" button was selected in blue.

It shows input LUT was selected and ready for selection of output LUT. After selected output LUT, you can click "Select Output LUT" button to finish the selection and move to input/output LUT combination process. If you release the input LUT, you just need to ckick "Set to Input Lut" once more.