ImageViewing
Still Image Display Area
You can view still image by loading from local file, capturing by IS-miniX, live capturing by IS-miniX, as graded, rendered image. You can select the point or area in the image to view the pixel value or copy to clipboard.
You can save the image in full resolution, before and after LUT processing.
Gray balancing or adjusting to the picked color can be easily performed.
The image is managed by each LUTBOXes, so if you changed the active LUTBOX, the image will be changed to the LUTBOX's settings.
The viewing image is basically rendered by the same LUT which is used for currently active LUTBOX, but by the setting on the graph window, you can show the image before LUT processing.
And when using HDR output, you can select SDR conversion for the viewing the image on this window.
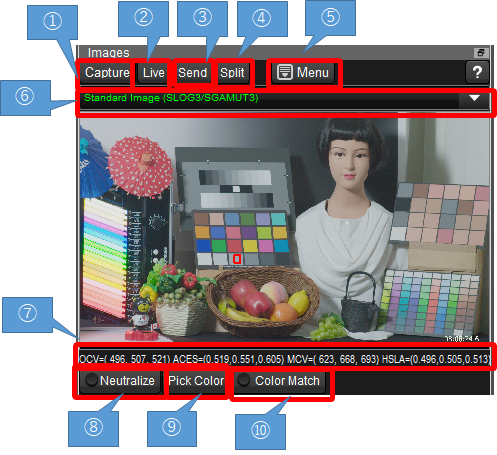
①Capture(IS-miniX)
IS-miniX is capable of capturing still image of from live video. Capture button is enabled and by clicking it the frame image is captured and shown on this area. The captured image was saved in the local disk with metadata as DPX file.
You can manage captured images by "Manage Captured images" function from Menu.
②Live Viewing(IS-miniX)
IS-miniX is capable of live image viewing for the confirmation of the image in real time. It depends on the emvironment but 5 to 10 frames per image is consecutively captured and shown on this area. You can make color correction while live viewing and the result was instantly appeared on the live image. If you selected the area in the image, the average values are calculated and shown for every frame. If you are showing wave form graphs, the graphs are automatically updated and the position of the pixel values are shown. It is very useful for the confirmation of shooting condition.
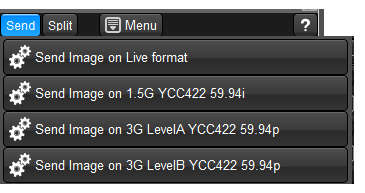
③Send Still Image(IS-miniX)
You can send still image to IS-miniX to output image instead of live motion picture. By clicking "Send" button, it will send the current selected image which was captured or load from local disk.
If input signal is valid and gen-locked, IS-miniX will output the still image in the same format of the input.
If the input signal is not available, the following menu will appear and you can select the format from 1.5G, 3G-A and 3G-B.
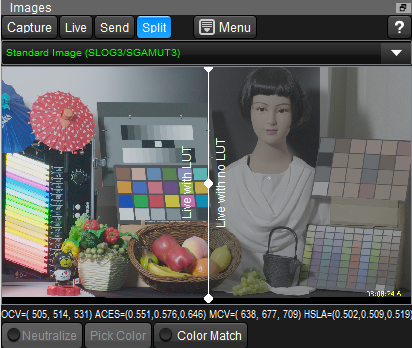
④Split viewing(IS-miniX)
You can slipt the image of IS-miniX's output.
When IS-miniX is running with normal live mode, it can split the image for with and without LUT processing. (following image)
You can change the area by moving or rotating the bar. Double clicking will swap the area of with and without LUT processing.
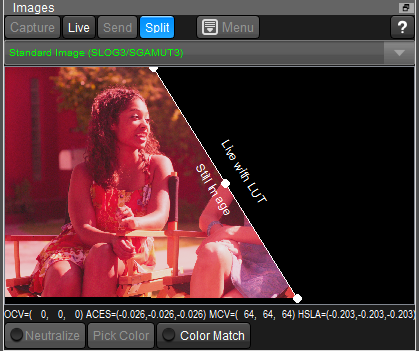
When IS-miniX is outputing still image, it will split live image and still image.(following image)
On this screen, live area is in black.
⑤Menu Button
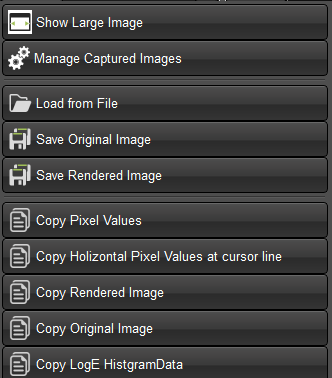
Show Large Image
Open the new window for showing image. It's useful when using second monitor.
Manage Captured Images
Open the new window for showing image. It's useful when using second monitor. Please refer to this page.
Load from File / Save Original Image / Save Rendered Image
You can load or save images from/to local disk. The supported format for loading is DPX, jpg, png and tiff.
Supported format for saving is DPX 10bit and Jpeg. "Save Original Image" will save the image before LUT processing, "Save Rendered Image" will save LUT processed image.
Copy Pixel values
This function copy the pixel values currently selected to the clipborad, which can be pasted to splead sheet like Exlcel. Here is the example of the data.
x |
y |
R(OCV) |
G(OCV) |
B(OCV) |
R(MCV) |
G(MCV) |
B(MCV) |
R(OCV10) |
G(OCV10) |
B(OCV10) |
R(MCV10) |
G(MCV10) |
B(MCV10) |
|
78 |
10 |
0.5103 |
0.5181 |
0.5337 |
0.7942 |
0.8495 |
0.8812 |
522 |
530 |
546 |
812.44 |
869 |
901.42 |
|
79 |
10 |
0.5073 |
0.5152 |
0.5288 |
0.7853 |
0.8407 |
0.8748 |
519 |
527 |
541 |
803.4 |
860.01 |
894.92 |
|
80 |
10 |
0.5015 |
0.5103 |
0.5259 |
0.7616 |
0.8236 |
0.8722 |
513 |
522 |
538 |
779.12 |
842.56 |
892.25 |
|
81 |
10 |
0.4995 |
0.5083 |
0.5239 |
0.7551 |
0.8171 |
0.8699 |
511 |
520 |
536 |
772.42 |
835.86 |
889.94 |
|
82 |
10 |
0.4966 |
0.5054 |
0.521 |
0.7452 |
0.8072 |
0.8665 |
508 |
517 |
533 |
762.37 |
825.81 |
886.48 |
|
83 |
10 |
0.4927 |
0.5005 |
0.5152 |
0.7355 |
0.7907 |
0.8505 |
504 |
512 |
527 |
752.37 |
808.92 |
870.04 |
|
84 |
10 |
0.4868 |
0.4976 |
0.5152 |
0.7051 |
0.7804 |
0.8517 |
498 |
509 |
527 |
721.29 |
798.37 |
871.33 |
|
85 |
10 |
0.4809 |
0.4907 |
0.5054 |
0.6894 |
0.758 |
0.8171 |
492 |
502 |
517 |
705.24 |
775.41 |
835.94 |
|
86 |
10 |
0.479 |
0.4888 |
0.5034 |
0.6835 |
0.7512 |
0.8104 |
490 |
500 |
515 |
699.25 |
768.5 |
829.08 |
|
87 |
10 |
0.478 |
0.4858 |
0.4985 |
0.6879 |
0.7413 |
0.7928 |
489 |
497 |
510 |
703.75 |
758.36 |
811.09 |
|
88 |
10 |
0.4761 |
0.4839 |
0.4985 |
0.682 |
0.7336 |
0.7935 |
487 |
495 |
510 |
697.7 |
750.49 |
811.79 |
Above table is the example pasted to Excel. R(OCV),G(OCV),B(OCV) columns are showing original image pixles values, R(MCV),G(MCV),B(MCV) columns are showing processed image pixel values, both in 0-1 scale. Further right colum's OCV10, MCV10 are showing the same pixels values in 0-1023 scale.
Copy Rendered Image / Copy Original Image
You can copy the image in 8bit bitmap format to the clipboard. It can be pasted to the other applications. "Copy Rendered Image" copies LUT processed image, "Copy Original Image" copies the image before LUT processing.
⑥Show select image dialog
Clicking the combobox on the top of the image triggers to show select image dialog.
This dialog provide various means of selection of the images. Please refer to here.
⑦Pixel Values
When you move the mouse cursor, you can confirm the pixels values here.
OCV |
The pixles values of origilan image in 10bit 0-1023 scale. |
MCV |
The pixles values of processed image in 10bit 0-1023 scale. |
⑧Neutralize

After selecting the rectangle area in the image, this button is enabled.
By clicking, the software calculate the parameter to adjust the gray balance of the area and apply to all area of the image. You can use gray chart or neutral color objects to make gray balance of the image.


If the neutralize is active, the button is in the active color and left side switch is on.
You can make the left side switch turn off to invalid the neutralize process temporally(right size button). Turning on the switch make recover the neutralize processing.
⑨Pick color as target color for color adjustment

After selecting the rectangle area in the image, this button is enabled.
The button is used to pick up color as the target of automatic color adjustment function.
If you picked the color, the button will change to like this.

The color in the button is came from the viewing image, but ACES linear color was picked as the target.
This target color selection is independent from LUTBOXes, it is only one color is used in the application.
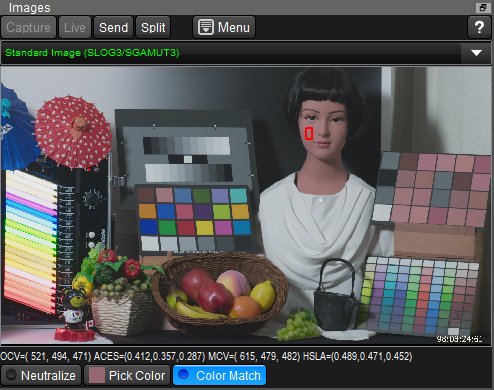
⑩Do color matching
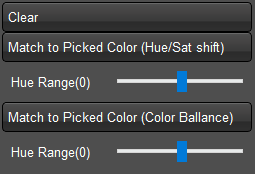
If the color was picked, and the area was selected in the image, "Color Match" button is enabled and by clicking the button, the above pop menu will appear.
By selecting "Match to Picked Color (Hue/Sat shift)", hue and saturation of the original image will be matched to the picked target color.
Hue range track bar is the control for the hue range of the adjusting color. This is the very good method to adjust color because other color than the target will not changed by this processing.
By selecting "Match to Picked Color (Color Balance)", color balance of the original image will be matched to the picked target color.
Hue range track bar is the control for the hue range of the adjusting color. This is another good method to adjust color.
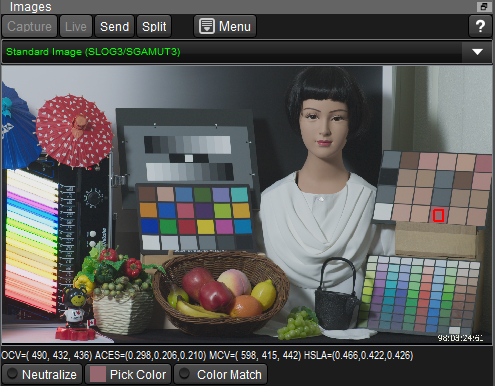
Left image is the example to select reddish skin tone chart to set the "Pick Color".
Right image is the example to adjust the doll's skin tone to Picked Color by selecting skin area and clicking "Match to Picked Color (Hue/Sat shift)" menu under color match button.
To clear the color matching, please click "Color Match" button and select "Clear".
⑪Monitor Calibration
"MonCal" button appears if you selected PC Screen Monitor Calibration on Setting Screen. If it's selected, the image was processed by monitor calibration to reproduce correct color on PC display. You can turn off it by not selecting this button.
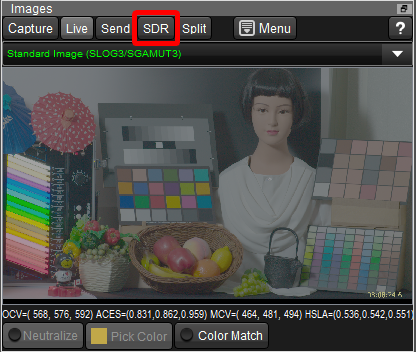
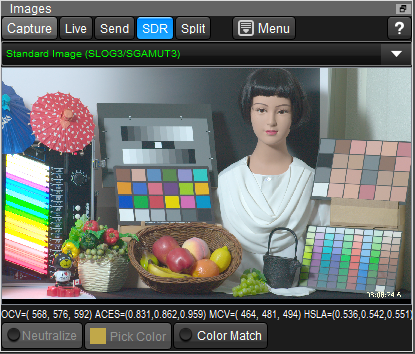
⑫HDR/SDR converted viewing
If HDR is using on the monitor setting, "SDR" button will appear in the image control(below left). If you click the button, it will transfer the image to Rec709/2.4 SDR to be suitable to view in the PC monitor(below right).