

How to use Tangent Panels
How to use and customize Tangent Panels
You can use Tangent Panels to make color correction on WonderLookPro. Currently, Tangent Wave, Element Kb, Element Tk and Ripple are supported. You can use them as default key assign, or make customization of key assigns after WonderLookPro ver4.2.
Preparation for Tangent Panel Control
First, please install Tangent Hub, which can be downloadable here.
https://www.tangentwave.co.uk/map-your-software/
Next, click "Setting" button on the main screen, and select "Other Settings" tab.
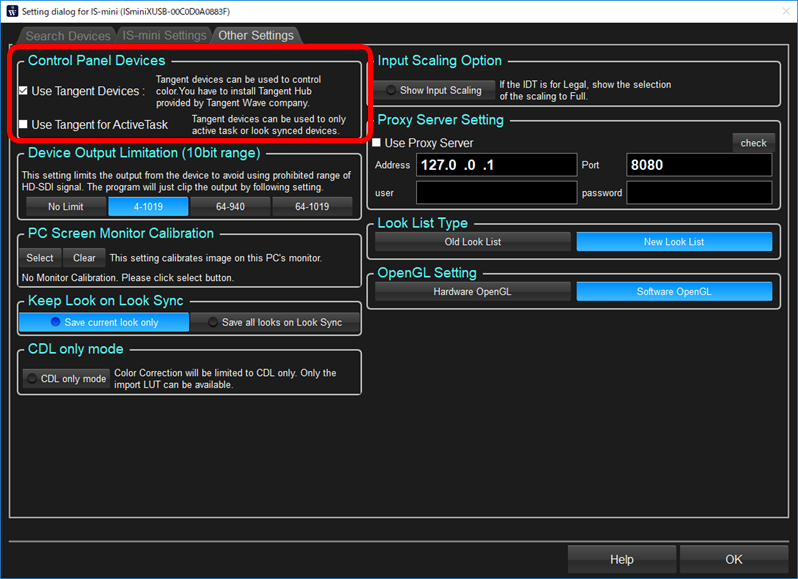
Please check "Use Tangent Devices" as above screen shot.
There are two method to assign Tangent device and LUTBOX like IS-mini.
1. To control active LUTBOX which was selected on the screen
If you check "Use Tangent for Active Task", the LUTBOX currently selected will be the target to be controlled by the Tangent device. You can change the active LUTBOX to be controlled by the action on Tangent device. It enables you to change the LUTBOX and create colors for them without showing the PC screen.
2. To assign different LUTBOXes to different Tangent devices
If you are using multiple Tangent devices, you can assign different LUTBOXes to different Tangent devices. In such case, please un-check 、"Use Tanget for Active Task" and select the Tangent devices for each LUTBOXes.
Click the icon of LUTBOX on main screen or color correction screen to open the device setting dialog.
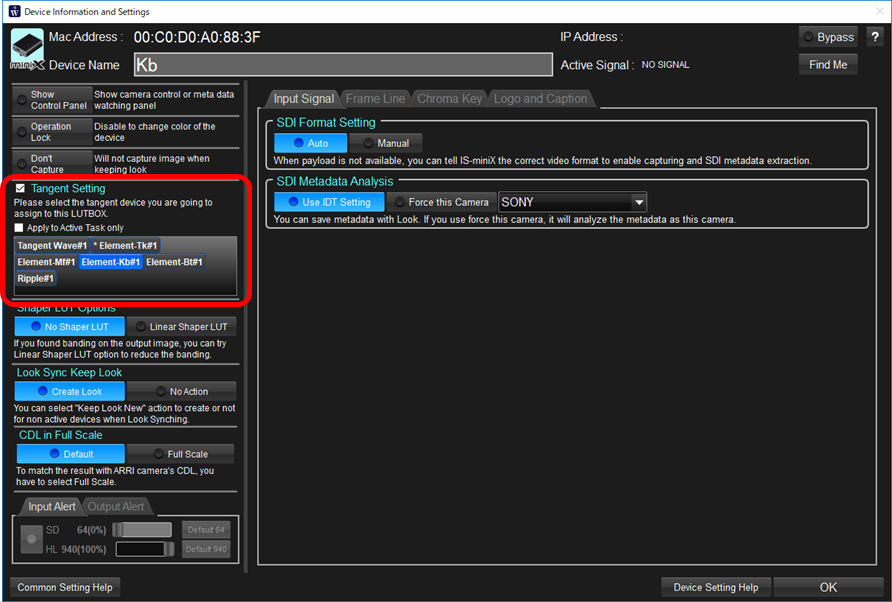
If you succeeded to install Tangent Hub, available Tangent Panels are shown in the rectangle in the above red area. If you touch any key on the Tangent panel, the name of the key and value are shown on the box to confirm which panel you are controlling. If you click the panel to be selected, the LUTBOX and the Tangent panels are connected. You can connect multiple Tangent panels to one LUTBOX.
Customize of the Tangent Panel Key Assign
After WonderLookPro ver4.2, you can customize the Tangent Panel's key assign. You can change the position of the key and the sensitivity.
Click the icon of LUTBOX on main screen or color correction screen to open the device setting dialog.
You can write down customize command on the text file. Save it and restart WonderLookPro enables the customization.
"Line1", "Line4" and "Line5" are the special keyword for the panel display. Please confirm that the panel display shows lines you wrote, which means customization is working.
The customization command format is below.
index of target command (will be replaced), new index of the command, target LMT mode number(-1 means all), changed LMT mode number, coefficient of sensitivity, IS-mini device index
index |
title |
explanation |
1 |
index of target command (will be replaced) |
The number of the command to be replaces. They might have different numbers even if the same function for different type of the panels. |
2 |
new index of the command |
The number of new command. |
3 |
target LMT mode number |
The number of LMT screen mode. The replacement will be effective only this LMT screen. If you are going to be effective all of the LMT mode, please omit this and later or write "-1". 0:ToneCurve 1:Simple 2:LGG 3:SOP 4:Vector 5:CCU -1:All |
4 |
changed LMT mode number |
You can assign another LMT screen for the new command. The screen will be change to this number, and the new command in the new screen will be performed. This enables you to assign different screen functions on one panel. If you do not change it, you can omit this and later, or write "-1". |
5 |
coefficient of sensitivity |
You can customize the sensitivity of each controls. 0.1 means 1/10 slower movement and 10.0 means 10 times faster movement. Default is 1.0 or write "-1", or omit this parameter and later. |
6 |
IS-mini device index |
You can change the active IS-mini device when replacing the command. If you use this parameter, the IS-mini device change will be done first, LMT mode change second, and finally command replacement will be performed. The meaning of the number is the order on the color correction screen, starting from 0. You can omit this parameter or write -1 if you do not use this function. This function enables you to assign same command for different cameras on one panel. |
Third parameter "target LMT mode number" or later parameters can be omitted. For example,
2000,2001
means, the function "Mode Change" assigned to 2000 will be replaced to "Keep Look" assigned to 2001 for all of the LMT mode.
2000,2001,1
means only the "Simple" screen, this replacement will be effective.
If you want to assign "Saturation" of LGG screen to Tangent Kb's No.0 Knob,
0,311,2 #0:No.1 Knobの回転 311: Saturation 2: LGG画面
1100,1311,2 #0:No.1 KnobのPush 311: Saturation 2: LGG画面
You can assign non-assigned functions to the real action.
1511,9050,-1 #1511:Bボタン+No.11 KnobのPush 9050: Operation Lock
Un-assigned function "Operation Lock" will be assigned to No.11 Knob with B button pushed.