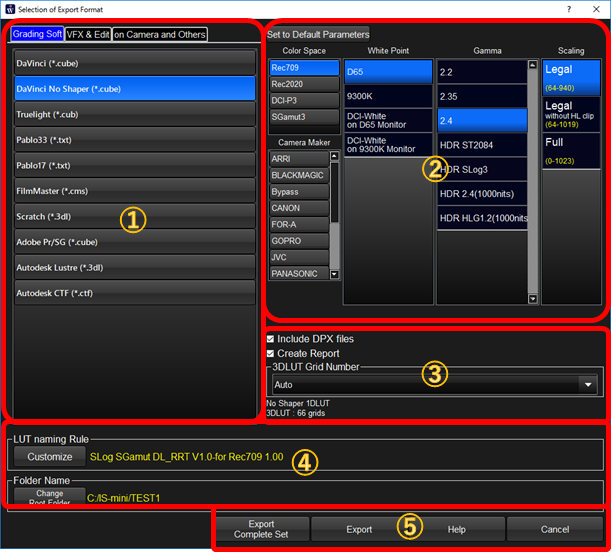
Export Setting Dialog
Export Setting Dialog

①Selection of LUT format
Please select LUT format first. Formats are categorized by the tabs.
②Selection of Output Color Space
Please select output color space parameters. If you want to use current LUTBOX setting, click "Set to Default" button on the top.
These selections appear when ODT is available. If ODT is not available, refer to here.
③Grid number of 3DLUT or other settings
You can select the number of grids of 3dLUT. The maximum number of grids are dependent on the format, and it will be shown on the below of section ③.
We confirmed that this maximum number of grids availability but there is no guarantee the LUT can be usable on the target software if you select the grid number exceed the maximum number.
And when report output is available, you can select doing report or not, or saving DPX image which was created with LOOKs or not.
④LUT's naming rule and the folder of export
You can set LUT naming rule and the folder LUT would be saved on this area. To change the rule of the naming, please click "Customize" button. The yellow color text is the filename based on the current naming rule.
Current target folder is shown in yellow characteres on the Folder Name area. If this folder is available, there would be no folder selection dialog and LUTs will be created instantly. If you want to change the target folder, please click "Change Root Folder" button.
⑤Execution of Export
Clicking "Export Complete Set" or "Export" button triggers exporting LUTs. If current grading space is "Input" or "Output", you can not use "Export Complete Set".
"Export" button triggers the export which creates only one LUT file, converting from input to output.
"Export Complete Set" triggers the export which creates multiple LUTs, which includes, input LUT converting from input to grading space, output LUT converting grading space to output like that.
The variations of LUTs are shown in the following table.

